Hello readers, Its been a while since my last post. Hope you are all well and safe😊

The price and discount can be setup for the following combinations of item, Customer and vendor:


Happy Daxing 😊
In this post, I am going to explain the Trade agreements in AX. It is also called as Price/discount agreements. Hope !! it will give you more insight on the way agreements are setup with vendors and customers.
As the name suggests, it is used to setup the prices (sales prices & purchase prices) and the discounts (Line discounts, Multiline discounts & Total discounts) for the item, customer and Vendor combinations. Once price and discount rules are set up in the trade agreements, the valid prices and/or discounts are fetched and applied to quotations, orders, and
invoices in AX.

A. Types of agreements
Following four types of agreements can be created for sales and purchase:
1) Price agreements: for setting up the sales and purchase prices for item & customer or item & vendor combinations which are used for fetching the item prices in sales and purchase orders. Prices are for each item hence it can only be setup for item code Table
2) Line discount agreements: for setting up the line discount for item & customer or item & vendor combinations which are used for fetching the discounts for sales or purchase order line
3) Multiline discount agreements: for setting up the discount for items & customer or item & vendor combinations which are applicable for multiple sales or purchase order lines. As Multiline discount is for multiple items combination, it cannot be setup for single item. It can always be setup for Item code Group or All
4) Total discount agreement: for setting up the discount for items & customer or item & vendor combinations which are applicable for the entire sales or purchase order. As Total discount is for the entire order, it is always application in the order header irrespective of any items in the sales or purchase order lines, hence it cannot be setup for item code Table or Group. It can always be setup for item code All
B. Agreement combinations
The price and discount can be setup for the following combinations of item, Customer and vendor:

C. Preference
Here preference is given to the item code or account code in the following manner while searching for the trade agreement for sales or purchase:
Table: First preference is given to code Table. When trade agreement is searched, it checks for the agreement created for single customer (Account code: Table) or single vendor (Account code: Table) and/or single item (Item code: Table) which are given in the sales or purchase order
Group: When trade agreement is not found for code Table, then second preference is given to code Group. When trade agreement is searched, it checks for the agreement created for the group of customers (Account code: Group) or group of vendors (Account code: Group) and/or group of items (Item code: Group). Item/ customer/ vendor which are given in the sales or purchase order should be part of those groups.
How to create price/discount groups for customers/vendors/ items are given below in this post.
All: When trade agreement is not found for code Table or Group, then third preference is given to code All. When trade agreement is searched, it checks for the agreement created for All items (Item code: All) and/or All customers (Account code: All) or All vendors (Account code: All). Items, customer or vendor which are given in sales or purchase order are part of code 'All'.
D. Prerequisites
Before we create any trade agreement in AX, it is important to complete certain prerequisites:
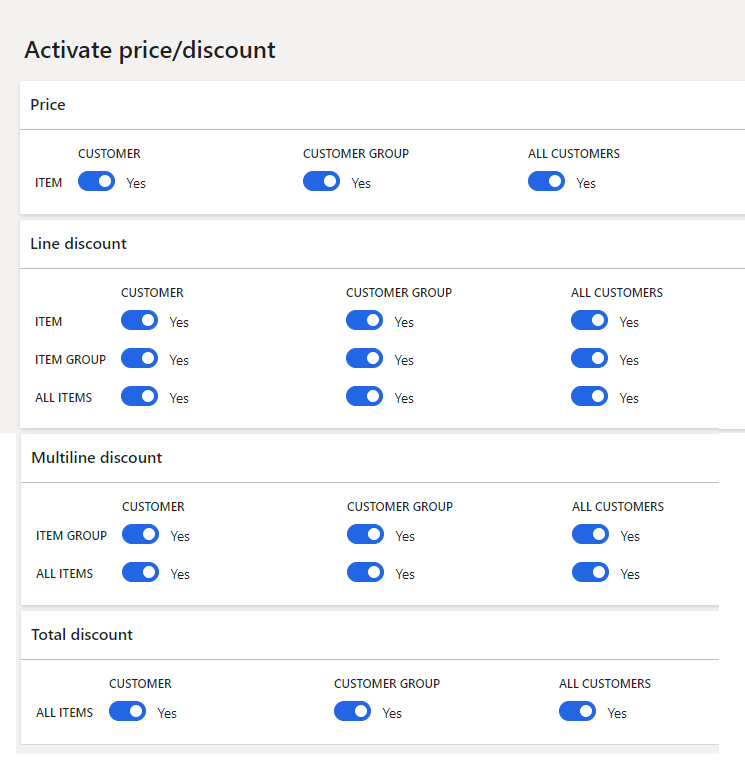
1. Activate trade agreement
It is important to activate certain trade agreement combinations in order to create the trade agreement for those combinations. It will reduce the risk of wrong combination being used and also improve the system performance as trade agreement search engine only searches for the active combinations trade agreements.
A. To activate price/ discount between item & customer
Path: Sales and marketing > Setup > Price/discounts > Activate price/ discount
Here you can activate item and customer combinations against the price, line discount, multiline discount and total discount by ticking the appropriate checkbox.
B. To activate price/ discount between item & vendor
Path: Procurement and sourcing > Setup > Price/discounts > Activate price/discount
Here you can activate item and vendor combinations against the price, line discount, multiline discount and total discount by ticking the appropriate checkbox.

2. Product, storage and tracking dimension groups setup
It is very important to keep the Product, storage & tracking dimension groups setup in mind while creating the trade agreement. The dimensions which are active in the product/storage/tracking dimension groups are very important while creating the trade agreement as these dimensions are used in the order and trade agreement search engine searches through these active dimensions while searching for the price or line discount for a specific item in the sales or purchase order. It includes active 'For sales prices' and 'For purchase prices' dimensions from the dimensions groups while searching for the prices for sales and purchase. It follows the following order in search for price/discount:
1. Firstly, it searches the trade agreement for the active product/storage/tracking dimensions which are used in the order for which price or line discount is requesting
2. If not found, it searches the trade agreement for the active product dimensions which are used in the order for which price or line discount is requesting
3. If not found, it searches the trade agreement with no active dimensions from product/storage/tracking dimension groups are specified
For example: If size is the product dimensions specified for the item, site and warehouse are the storage dimensions specified for the same item, serial number is the tracking dimensions specified for the item in the order, then
- It first checks the trade agreement for the size, site, warehouse and serial dimensions for the item. If not found then,
- It checks for the trade agreement for the size dimension for the item. If not found then
-Finally it checks the trade agreement where no size, site, warehouse and serial dimensions are specified.

3. Setup trade agreement journal names
It is important to setup trade agreement journal names as these journal names are used to create price /discount agreement journal for setting up different prices and discounts for different items, customers and vendors. Different journal names can be setup for different purpose such as price agreement journal, Discount agreement journal, Price adjustment journal, Price&discount journal from RFQ etc. so it will be easier to select appropriate journal names for specific purpose. In this way it will be easier to consolidate all the similar trade agreements for reporting and analysis purpose. Journal names are created at the following path:
Procurement and sourcing > Setup > Price/Discounts >Trade agreement journal names
or
Sales and marketing > Setup > Price/Discounts >Trade agreement journal names
Following default relation can be setup for journal names. These relations can be override in the actual trade agreement journal if require:
-Price(purch.)
-Line disc. (purch.)
-Multiline disc. (purch.)
-Total disc. (purch.)
-Price (sales)
-Line discount (sales)
-Multiline disc. (sales)
-Total disc. (sales)
-Postage discount
These are nothing but various ways of creating price/discount agreement journal lines.
Add name, description and select default relation to create specific trade agreement journal name.

We can also see all the posted price/discount agreement journals created from a particular journal name. Click on 'Price/discount agreement' button on the top to view all the journals.

4. Create price/discount groups
Create price groups, line discount groups, multiline discount groups and total discount groups for the items, customers or vendors so it can be used in trade agreement journals for setting up prices and discounts for the group.
Groups can be created by selecting appropriate options among Price group, Line discount group, Multiline discount group and Total discount group.
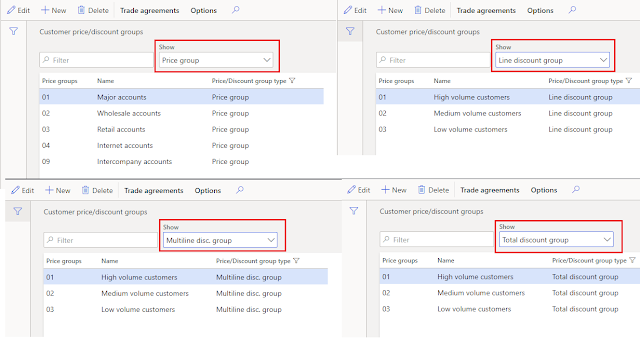
A. Customer price discount group
We can create price or discount groups for the customer by selecting appropriate options from the following path:
Path: Sales and marketing > Price/discounts > Customer price/discount groups
or
Inventory management > Setup > Price/discount > Customer price/discount groups

We can also view the trade agreement and create the one for the customer price/discount group selected. Select the group --> Click on 'Trade agreements' button to view the appropriate options.

B. Vendor price discount group
We can create price or discount groups for the vendors by selecting appropriate options from the following path:
Path: Procurement and sourcing > Setup > Price/discount > Vendor price/discount group
or
Inventory management > Setup > Price/discount > Price/ discount groups > Vendor price/discount groups

You can view the trade agreement and also create the one for the vendor price/discount group selected. Select the group --> Click on 'Trade agreements' button to view the appropriate options.

C. Item discount group
It creates the Line discount group, Multiline discount group and Postage group for the items. It doesn't include the total discount group as total discount is applicable to item code All and not to item code Group.

You can create discount groups for the items from the following path:
Path: Sales and marketing > Price/discounts > Item discount groups
or
Procurement and sourcing > Price/discount > Price/discount groups> Item discount groups
or
Inventory management > Setup > Price/discount > Item discount groups

You can view the trade agreement and also create the one for the item discount group selected. Select the group --> Click on 'Trade agreements' button to view the appropriate options.

5. Item/ Customer/ Vendor master setup
A. Assign item discount groups for items
Once Item line discount groups and Item Multiline discount groups are created (Refer point 4 section C), those are assigned to items and discount agreements are created for those groups. When any such item is used in the sales or purchase order, the discount pertaining to that group will be applicable to the item in the order.
Path: Select specific item in the released products > Purchase or Sell fast tab > Discounts field group > Line discount group/ Multline discount > Assign groups to these fields as applicable

Note: For total discount, checkbox needs to be ticked for the item in order to include the item in the calculation of total discount.
B. Assign customer price/discount group to customers & vendor price/discount group to vendors
- Once vendor price/ discount groups are created (Refer point 4 section B), those are assigned to vendors and agreements are created for those groups. When order is created for any such vendors, the price and discount for the group is applicable to the order (Order header/Order lines)
Path: Select vendor > Purchase order defaults fast tab > Discount field group > Multiline discount/ Total discount group/ Price group/ Line discount group > Assign groups to these fields as applicable

- Once customer price/discount groups are created (Refer point 4 section A), those are assigned to the customers and agreements are created for those groups. When order is created for any such customer, the price and discount for the group is applicable to the order (Order header/ Order lines)
Path: Select customer > Sales order defaults fast tab > Discount field group > Multiline discount/ Total discount / Price / Line discount > Assign groups in these fields as applicable

6. Account receivable parameters Setup
Different values are setup in the account receivable parameter to set the behaviors of sales trade agreement.
Path: Account receivable > Setup > Account receivable parameters > Prices
- Setting up the date type i.e. Today's date, requested ship date or requested receipt date Depending on the date type selected here, the appropriate date will be picked up from the sales order to find the valid sales trade agreement. Default value is 'Today'
- Optional: Setting up the generic currency and exchange rate type: Trade agreement can also be created for generic currency and then use exchange rate to convert generic currency into a specific order currency in real time when price is requested from the sales or purchase order. When creating the trade agreement for generic currency, make sure to tick 'Include generic currency' checkbox in the agreement journal. This setup is only applicable to price trade agreement and not to the discount agreements.
- Optional: Apply smart rounding after currency conversion: It is checked when you would want to apply smart rounding to the price when it is returned from the valid trade agreement. In order to apply smart rounding you would need to setup the behavior for smart rounding for foreign currencies in the system. It is nothing but returning the price keeping in view the smallest denomination i.e. price returned with ending 0.99 or 0.95 or 0.98. When price for generic currency is converted into order (Foreign) currency then before returning the price, smart rounding rules are applied depending on setup done in the system for different foreign currencies in order to decide the ending of the price i.e 156.95. 199.99 etc.
- Discount: Default values is 'Line'. It decides how Line discount and Multline discount are used together in the sales order lines. We can select different values depending on how we want discounts to get applied, These values are:
-Multiline
-MAX(Line, Multiline)
-MIN(Line, Multiline)
-Line+Multiline
-Line*Multiline
- Optional: Trade agreement evaluation: During changing the price and discount conditions by the external sources, if you want to trigger a dialog to decide whether to keep current price/discount or it should inherit from external sources, then add the type of external sources such as AIF, retail POS, Sales agreement, Sales quotation, project quotation etc. in the trade agreement evaluation section in account receivable parameter
- Optional: Calculate Total discount on posting: If ticked, total discount will be calculated automatically when posting and when selecting certain actions

7. Procurement and sourcing parameters Setup
Different values are setup in the procurement and sourcing parameter to set the behaviors of purchase trade agreement
Path: Procurement and sourcing > Setup > Procurement and sourcing parameter > Prices
- Setting up the date type i.e. Today's date or Delivery date: Depending on the date type selected here, the appropriate date will be picked up from the purchase order to find the valid purchase trade agreement. Default value is 'Today'
- Discount: Default values is 'Line'. It decides how Line discount and Multline discount are used together in the purchase order lines. We can select different values depending on how we want discounts to get applied, These values are:
-Line
-Multiline
-MAX(Line, Multiline)
-MIN(Line, Multiline)
-Line+Multiline
-Line*Multiline
- Optional: Trade agreement evaluation: During changing price and discount conditions by the external sources, if you want to trigger a dialog to decide whether to keep current price/discount or it should inherit from external sources, then add the type of external sources such as AIF, retail POS, Sales agreement, Sales quotation, project quotation etc. in the trade agreement evaluation section in procurement and sourcing parameter
- Optional: Calculate Total discount on posting: If ticked, total discount will be calculated automatically when posting and when selecting certain actions.

E. Different values for searching the price/discount agreement
Below values are used from the sales or purchase order lines to
search for the valid price and discount agreement for those order lines:
● Customer/vendor
● Item number
● Product dimension, Storage dimension and Tracking dimension
● Quantity
● Currency
● Unit of measure
●Date type (defined in the Accounts receivable parameter setup and Procurement and sourcing parameter setup)
1. For price:
As per the preference given above (In section A), the combination of Item and customer or item and vendor are searched along with other values defined above to find the valid price trade agreement. Posted trade agreements are searched based on the order in which those are created (based on RecID). When all the trade agreements are searched or when valid trade agreement is found where Find next option is cleared then the search stops. If multiple trade agreements are found for the combination to get the valid price then trade agreement with lowest price will be considered for the order line
2. For Line discount:
As per the preference given above (In section A), the combination of Item and customer or item and vendor are searched along with other values defined above to find the valid trade agreement for line discount. Posted trade agreements are searched based on the order in which those are created (based on RecID). When all the trade agreements are searched or valid trade agreement is found where Find next option is cleared then the search stops. If multiple trade agreements are found for the combination to get the valid line discount, then it takes the sum of all the valid line discount or the valid line discount percentage for order line
3. For Multiline discount: (It is created for Account code Table, Group & All and Item code Group & All)
Below values are used from the sales or purchase order lines to search for the valid price and discount agreement for those order lines
- Customer/ Vendor
- Item's multiline discount group
- Overall quantity
- Currency
- Unit of measure
- Date type (defined in the Accounts receivable parameter setup and Procurement and sourcing parameter setup)
Overall quantity:
It is the sum of quantities of all items belong to specific Multiline discount group and sum of quantities of all items that isn't belong to any multiline discount group.
For example: If there are 8 lines in the sales order, out of which lines 1, 3 and 4 are belong to Multiline discount group A, so it takes the sum of quantities of those lines, lines 2 and 6 are belong to multiline discount group B, so it takes the sum of quantities of those lines, Line 5, 7 and 8 are not belong to any multiline discount group, so it takes the sum of quantities of those lines as well.
Once this quantity categorization is done, as per the preference given above (In section A), the combination of Item and customer or item and vendor are searched along with the values defined above to find the valid trade agreement. Posted trade agreements are searched based on the order in which those are created (based on RecID). When all the trade agreements are searched or when valid trade agreement is found where Find next option is cleared then the search stops. If multiple trade agreements are found for the combination, then it takes the sum of all the valid discounts or the valid discount percentages for each order line.
Note: For all those lines where no multiline discount group is attached, the multiline discount trade agreement created for item Code All are applicable,.
4. For Total discount (It is created for Account code Table, Group & All and Item code All)
Below values are used to search for the valid trade agreement:
- Customer/ vendor
- Currency
- Total order amount
- Date type (defined in the Accounts receivable parameter setup and Procurement and sourcing parameter setup)
As per the preference given above (In section A), the combinations for customer or vendor are searched along with the values defined above to find the valid trade agreement. Posted trade agreements are searched based on the order in which those are created (based on RecID). When all the trade agreements are searched or when valid trade agreement is found where Find next option is cleared then the search stops. If multiple trade agreements are found for the combination to get the valid total discount, then it takes the sum of all the valid total discounts or the valid total discount percentages for the entire order.
Once all these setups are understood and completed, we are good to create trade agreement in the system for different customers, vendors and items. To understand on how to create & post trade agreement will be explained in the next blog post.
Please post if any queries or suggestions to made regarding this topic !!!
Happy Daxing 😊
------------------------------------------------------------------------------------------------------------------------------------
Abhijeet Hele | Dynamics AX Enthusiast | My Profile |
Disclaimer: The information provided on this site represents my own opinion/view and does not represent the opinion/view of my employer or Microsoft.