Inventory transaction statuses for Sales order in AX 2012

Inventory transactions consist of all the issue and receipt transactions associated with the selected product and product master.

When we process the order (sales, purchase etc.), inventory transaction status (Issue status and Receipt status) changes in each stage of the cycle.

Inventory transactions status reflects the actual state of particular quantity of inventory of a particular product i.e. whether it is On order, Ordered, Picked, RegisteredDeducted, Received, Sold, Purchased etc.

Here in this topic, we will see the inventory transactions status at various stages of a sales order cycle.

As it is a sales order, issue field in the inventory transaction form will get updated with the various statuses of the inventory.

Issue statuses are as follow:
1. Quotation issue
2. On order
3. Reserved ordered (The item is not available and is reserved from a purchase order)
4. Reserved physical (The item is available and is reserved for a sales order)
5. Picked
6. Deducted
7. Sold

Navigation path (to view the inventory transactions)
a. Go to Sales and marketing / Account receivable --> Common--> Sales orders --> All Sales orders --> Select desired sales order -->Edit --> go to Sales order lines --> Select desired line --> Click on Inventory --> Transactions.


b. Go to Product information management -->Common --> Released products --> Select desired product --> On the action pane, go to Manage inventory tab --> In the view group, click on Transactions.


Inventory (Issue) transactions status


A. At sales quotation
Once the Quotation is created and sent to the customer for approval, the transaction status goes to "Quotation issue" state.


Go to inventory--> Transactions


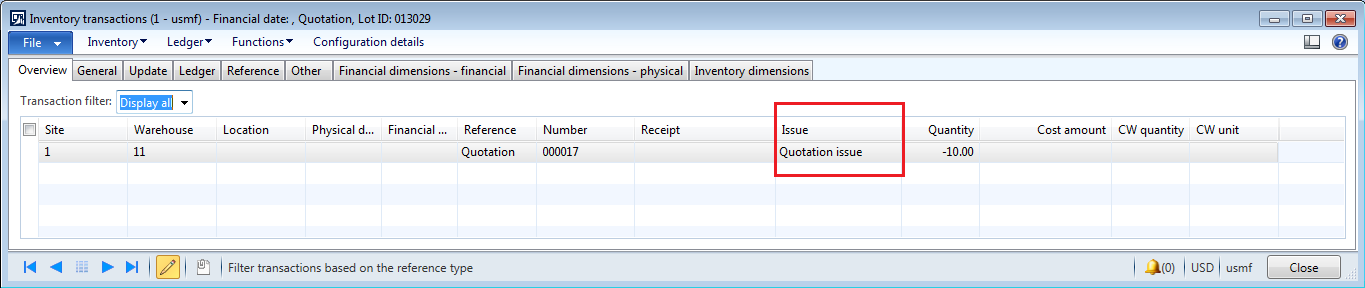
Note: Status will remain the same till the time sales quotation will not convert to sales order.

B. After creating a sales order
Once the quotation converts to a sales order, the inventory transaction status for a particular quantity of item goes to "On order" state.


Go to inventory --> Transactions


Note: Even if we directly create a sales order without using the sales quotation, the inventory transaction status goes to "On order" state only.


C. After the Sales order confirmation
After the confirmation of a sales order, the transaction status remains in "On order" state as confirmation doesn't affect the inventory by any means.


D. After posting the picking list
After posting the picking list, the inventory transaction status goes to "Reserved physical". The quantity of item gets reserved in the warehouse to get it picked for a sales order.


Note: Quantity needs to be available for the item in the warehouse in order to reserve them for the order. If the "Partial quantity" is available then the same quantity is only reserved for the order and remaining quantity will remain "On order".


E. After picking list registration

Once the item gets picked from the warehouse, the picking list will get updated with the picked quantity hence the inventory transactions status goes to "Picked " state.


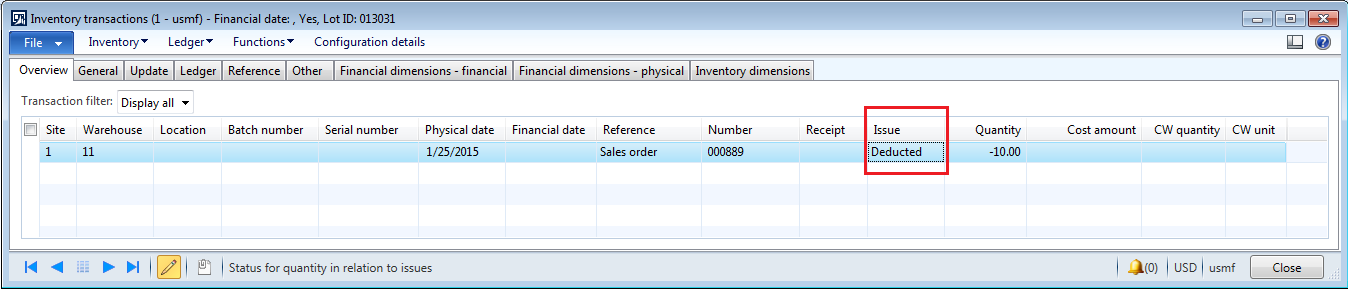
F. After posting the packing slip
Once the packing slip gets posted, the inventory transactions status goes to "Deducted" state as the item gets delivered to the customer so inventory gets reduced for the item in the warehouse.


G. After posting the sales order invoice

Once the invoice is generated for a sales order, the inventory transaction status goes to "Sold" state. The same invoice is then send to the customer for payment.


Note:
Reserved ordered: If the item is not on hand then we can reserve the item from a purchase order so once the item is received from a vendor, it can only be used to deliver it to the customer.

We can also create a purchase order from a sales order in case of non-availability of the item.

In both the cases, the inventory transactions status goes to "Reserved ordered". 


In this way, Inventory (Issue) transactions status changes in each stage of sales order cycle.
  
Happy Daxing :-)

Movement journal in AX 2012

Movement journal is used to move the inventory "in" and "out" of warehouse for specific reasons/purposes.


If the quantity is negative, it means item is taken out of inventory to be used by the Sales Department for some purpose, for example: to take it to a sales show. The inventory value must be reduced and should be considered as an expense from the Sales Department. Here expense account can be tagged as an offset account.

If the quantity is positive, meaning that the item is brought into inventory from an outside source, for example, a salesperson brings samples into inventory, the Cost amount field can be used to enter the value of the item.

Inventory movement journal is used:
1.  For intake (increase) and outtake (decrease) of the inventory.
2.  For Writing-off the inventory to specific main accounts such as "scrap".
3. To bring in opening inventory balances during system setup, and offset these adjustments to specific ledger accounts.
3. To charge an item to a different department, for example, from prototyping to engineering.

Financial impact
If the inventory is increase during movement then inventory profit and inventory receipt accounts will get updated with the inventory cost.

If the inventory is decrease during movement then inventory loss and inventory issue accounts will get updated with the inventory cost.

Steps to create inventory movement journal
1. Go to inventory management --> Journals --> Inventory transactions --> Click on Movement.
2. Click on "New" to create a new movement journal.


3. Select:
a. Name: Select journal name from the dropdown list.
b. Journal:It is a journal number generates automatically as the number sequence is set to "Continuous".
c. Description: It will come automatically from the journal name. We can also edit the same as per our requirement.

Note:Different journal name can be created (Inventory management --> Setup--> Journals--> Journal names, inventory) based on the type of inventory movement such as movement for display items in exhibition, Outward movement of items to scrap etc.

4. Click on "Lines" to add items in the journal lines.


5. Enter:
a. Item number: Enter items which you want to move in/out of warehouse.

Inventory dimension
b. Storage dimension: Enter the Site, warehouse, location, pallet id. Here Site and warehouse are mandatory storage dimension. Location and pallet id can be entered or make it mandatory as per the requirement.
c. Tracking dimension: Enter batch number and serial number if mandatory.

d. Outward movement:
    i. Quantity: if the item is moving out of warehouse then negative quantity is entered.
    ii.Cost amount: If the quantity is negative, you cannot edit the value displayed in the cost amount/cost price field.

Note:Cost price is already present against the item when item is available in the inventory. While taking the item out, system will take the same cost price.

e. Inward movement:
   i. Quantity: If the item is moving in the warehouse, positive quantity is entered.
   ii. Cost price: If the quantity is positive then you can edit the value displayed in the cost amount/cost price field i.e you can enter the item cost in the cost amount/cost price fields.

f. Offset account: Select main account in the offset account field to offset the movement of item. 

NoteMain account keeps track of movement transactions. Different main accounts can be use for specific activities in the movement journal like  incoming or outgoing of items, to bring in opening balances for inventory, writing-off inventory as scrap.
  
g. Financial dimensions: Financial dimension will come automatically if it is setup against the item in the item master form. If it is not setup in the item master form then you need to add dimensions manually in financial dimension tab in movement journal.

Validate
6. Once all required information is entered, click on Validate button to validate the journal.


7. Click Ok to Validate the journal.


Note: If you get any errors, warnings then address them first and then re-validate again to check the journal.

Post
8. Click on Post button to post the journal to get an inventory and financial impact.


Note:Place a checkmark if you want to transfer all the defective lines to a new journal.

9. Click Ok to post the journal.


10. Go to Inventory --> transactions for journal line.


11. You can see 2 quantity is updated in the system i.e. 2 quantity is increased in the inventory for the item.
12. You can also see the cost amount updated is the same amount which we have entered manually against the item in the journal line.
13. Go to Ledger --> Financial voucher to see the financial impact.


14. In the above example, as the inventory is increased during movement, inventory profit and inventory receipt accounts are updated with the inventory cost. 

Note: Here system took the same offset account which we have selected manually in the movement journal for offsetting (inventory profit) purpose, instead of taking the account from the posting profile.(item --> manage costs -->select item group -->go to item group form --> Inventory tab --> profit). 

In this way, we can create and post a movement journal in AX 2012.

Please post if any queries or suggestions to be made on this topic.

Happy Daxing :-)

------------------------------------------------------------------------------------------------------------------------------------
Abhijeet Hele |  Dynamics AX Enthusiast | My Profile 

The information provided on this site represents my own opinion/view and does not represent the opinion/view of my employer or Microsoft.

Inventory adjustment journal in AX 2012 (Profit and loss journal in old AX versions)

Hello Everyone,
In this topic, we are going to see the importance of creation & posting of inventory adjustment journal and its significance in business.

Inventory adjustment journal (Profit and loss journal) is use in AX for making the adjustment in inventory in order to maintain the inventory accuracy in the system. It is also use to write off inventory from the system.

Inventory adjustment journal is used when:
1.Item lost from the inventory.
2.Item gets damaged due to mishandling or by any other means.
3.Sometimes item which is lost or stolen can be found/recovered.

In order to match the quantity in the system with the actual physical quantity, the inventory adjustment journal is posted, there by we maintain the inventory accuracy.

Inventory adjustment journal automatically applies financial transactions to preset accounts for profit and loss.

Steps to create and post the adjustment journal:
1.Go to inventory management > Journals > Item transactions > Inventory adjustment.


2. Click on "New" to create new adjustment journal.


3. Select:
a. Name: It is a journal name created for adjustment journal consist of setups like journal types, voucher series etc. which are necessary while creating a journal.
b.Journal: Journal number generates automatically as the number sequence is set to "Continuous" in this case.
c. Description: It will come automatically from the journal name. We can also edit the same as per our requirement.

3. Click on Lines to open the journal lines form.


4. Enter:
    a. Item number: Enter the item number for which adjustment needs to be done
    b. Storage dimension:Enter storage dimensions such as Site, warehouse, Location, pallet id.

   Note: Here Site and warehouse are the mandatory dimensions. Locations and pallet id can be entered if it is mandatory.

    c.Tracking dimension: Enter tracking dimensions such as batch number, serial number if mandatory.

5. Quantity and cost amount: if you are adding the inventory then enter the positive value in the quantity field. If the quantity is positive then you can edit the value displayed in the cost amount/cost price field.

6. Quantity and cost amount:if you are reducing the inventory then enter negative value in the quantity field. If the quantity is negative then you cannot edit the value displayed in the cost amount/cost price field.


7. If you want to post the adjustment for some other items then add some more lines in the journal.

Validate
8.Once all required information is entered, Click on validate button to validate the journal


9. Click Ok for validation.


Note: If you get any error, warning  then address them first and then re-validate again to check the journal.

Post
10. Click on post button in order to post the journal.


Note:Place a checkmark if you want to transfer all the defective lines to the new journal.

11. Click Ok to post journal.


Inventory Transactions
12. Go to inventory >  transactions for the line which has negative quantity


13. You can see that the -2 quantity is updated in the system i.e. 2 quantity is reduced from the inventory and cost amount is calculated for the same automatically.

14. Go to inventory > transactions for the line which has positive quantity.


15. You can see that 3 quantity is updated in the system i.e. 3 quantity is added in the inventory and cost amount is also the same amount which we have entered in the journal lines.

Financial impact
16, Go to Inventory > transactions > Ledger > Financial voucher


17. If the inventory is increased during adjustment then inventory profit and inventory receipt accounts will get updated with the inventory cost.
18. If the inventory is reduced during adjustment then inventory loss and inventory issue accounts will get updated with the inventory cost.

Due to above reasons, the inventory adjustment journal is also called as profit and loss journal.

In this way, we can create and post the inventory adjustment journal.

Please post if any queries or suggestions to be made on this topic.

Happy Daxing :-)

------------------------------------------------------------------------------------------------------------------------------------
Abhijeet Hele |  Dynamics AX Enthusiast | My Profile 
The information provided on this site represents my own opinion/view and does not represent the opinion/view of my employer or Microsoft.

Replacement order in AX 2012 R3 (Before receiving an item which is rejected by customer)

Hello everyone,
In continuation to what we had seen in the last post (Refer link: Replacement order), in this post I will explain you the creation of replacement order before the receipt of items that are rejected by customer.

In the last post, we saw replacement order creation after the receipt of items which are returned. (To know more referhttp://theaxeffect.blogspot.com/2014/12/replacement-order-in-ax-2012-r3.html )

Replacement order is the process of replacing the items (which are rejected by customer) with the new items in order to fulfill the customer's demand.

Customer asks for replacement:
1. When an item doesn't meet the quality criteria set by the customer.
2. When an item gets damaged during transit.
3. When the wrong item send to the customer.

Business scenario:
Assume that the customer placed the order for 10 quantities of item. Company sent those 10 quantities to the customer. Those items when received at customer's place, sent to the quarantine warehouse for quality inspection. When quality inspection happened as per the quality criteria set by the customer, Quality control manager found some items defective. They informed this to their purchasing manager who then decided to return the items back to the company.

They informed the company about the same and conveyed their urgency for replacement as it is affecting their business.
In consideration to urgency and the criticality of replacement, company decided to send the replacement items before the rejected items come back from the customer.
In this scenario, replacement order will get created from the return order in AX to facilitate the replacement of items to the customer.

Other scenarios:
a. Sometimes taking the items return from the customer are costlier for the company than scraping those items at customer's place and sending the replacement for those items. (In this scenario, items which have not returned will get posted as Scrap in the system.
b. Sometimes items will get damaged (During transit) so much that it is not worth taking it back. In this scenario, replacement order will get created without receiving the items back.

Steps to create a replacement order in AX 2012 R3:
1.Go to Sales and marketing > Common > Return orders > All return orders. 


2. Click on Return order button to create a new return order.


3.Enter customer number (For which we are creating a return order), RMA number (If it is not auto-generated), Return reason code (If it is mandatory).
4.Once the return order gets created, Click on Find sales order button to select the lines from invoiced sales orders.


5.Select the lines from multiple invoiced sales order for the same customer


6.Click ok to get those lines in the return order.

7.Once done, Replacement order button will get enabled to create a replacement order.


8.Click on Replacement order button to create a replacement order without receiving the rejected items.


9.Create sales order form will get open, having a customer information.
10. Enter other details as per the requirement and click ok to create a new sales order.

Note:Copy return order lines checkbox should be ticked (Marked Red above) to get the return order lines in the replacement order.

11.Go to Sales and marketing > Common > Sales orders > All Sales orders.


12.New sales order will get created having same items and quantities as mentioned in the criteria specified for replacement order.
13.Now process the sales order in order to send the replacement items to the customer i.e. post confirmation, Picking list, Packing slip and invoice.

In this way, we can create a replacement order without processing the return order i.e. before even taking the items back from the customer.

Note:Return order will process separately when the items are ready for return from the customer.

Please post if any queries or suggestions to be made on this topic.

Happy Daxing!!!!

------------------------------------------------------------------------------------------------------------------------------------
Abhijeet Hele |  Dynamics AX Enthusiast | My Profile 
The information provided on this site represents my own opinion/view and does not represent the opinion/view of my employer or Microsoft.

Replacement order in AX 2012 R3

Hello everyone, today we are going to see a replacement order in AX 2012. In this post, I will explain you the importance of creating a replacement order, need for creation of replacement order and its significance in business.

What is replacement order?
It is the process of replacing the items (which are rejected by customer) with the new items in order to fulfill customer's demand.

Reason for replacement
1. When an item doesn't meet the quality criteria set by the customer.
2. When an item gets damaged during transit.
3. When wrong item send to the customer.

Business scenario:
Assume that the customer placed the order for 10 quantities of item. Company sent those 10 quantities to the customer. These items when received at customer's place, sent to the quarantine warehouse for quality inspection. When quality inspection happened as per the quality criteria set by the customer, Quality control manager found some items defective. They informed this to their purchasing manager who then decided to return the items back to the company.

Based on the negotiation between the customer and the company, the company agreed to take the items back from the customer and decided to replace the items with the new items.

In this scenario, replacement order will get created from the return order in AX to facilitate the replacement of items to the customer.

Background
Replacement order is usually created when an item is returned and inspected. However when an item must be replaced before it has been returned or when the original items will not be returned (as it is damage badly or the returned cost is more for the company), you can create an item replacement order immediately after you create a return order. 

There are two ways to create a replacement order:
A. Replacement order after the receipt of returned items.
B. Replacement order before the receipt of returned items.

Part A:
Here in this post, we will create a replacement order after the receipt of the returned items.

Steps to create a replacement order in AX 2012
1.Go to Sales and marketing > Common > Return orders > All return orders.


2.Select a existing return order. 


Note: The return order items inventory transactions should be in registered state in order to create a replacement order for the same.

3. During registration (through the return order form or by the arrival overview) of returned items, proper disposition action needs to get selected i.e. either Replace and credit or replace and scrap. Only by selecting these actions, we can create a replacement order through return order.

Note:Before posting the return order packing slip, we need to create a replacement order otherwise system throws the below error:


4. Once the items are registered in the system, go to return order line > Click on Return line > Click on Replacement item.


5. Select items and its specifications for replacement.
6. Select quantity for replacement in Sales quantity field per item.


7. Click on Apply to setup a replacement order through return order.
8. After this, click on packing slip to generate the packing slip for return order.


9. Click ok to post the packing slip for the returned order.
10.Once packing slip gets posted, system automatically creates a new sales order for sending the replacement items to the customer.
11.The sales order created will have the same items with same specifications as we have selected in replacement order setup.
12. Go to Sales and marketing > Common > Sales orders > All sales orders 


12.You can see the new sales order created for replacement.
13.After this,we can process this sales order as like normal sales order. (Post confirmation, Picking list, Packing slip and invoice)
14. This will deliver the replacement items to the customer and will have proper financial and inventory impact in the system.

Note:The return order for which we have posted the packing slip can be invoiced so that both the invoices (Replacement sales order invoice and returned order invoice) adjust the financial impact to give correct financial results against the customer.

In this way we can create a replacement order in AX 2012 R3. 

Please post if any questions or suggestions to be made on this topic.

See you all soon with the new topic.

Happy Daxing :-)

------------------------------------------------------------------------------------------------------------------------------------
Abhijeet Hele |  Dynamics AX Enthusiast | My Profile 
The information provided on this site represents my own opinion/view and does not represent the opinion/view of my employer or Microsoft.

Manage contractual commitments with purchase agreement in D365 supply chain management

Hello Reader, In this post, I am going to deep dive into purchase agreement management in D365 supply chain and how it is useful in managing...