Hello readers, In this post I am going to explain the broker contract management or broker commission / fee management in D365 F&O.
In broker contract management, company enters into the contract with broker for receiving broker's service for selling of item(s). For example: company enter into the contract with broker for selling of particular brand of shoes.
In this case, broker will sell the item(s) on behalf of company and earn the commission against each sell. Commission can be based on number of item sold or the amount of item sold. The commission will be calculated as a percentage of sell or fixed amount or amount per pcs (Per unit)
This is a good marketing strategy for boosting the sell of item(s) and having this functionality available in the system, certainly make the task easier for the company as managing the brokerage payment or broker fees will be easier through broker contract management which will reduce the burden
Setups:
You need to perform following setups in the system to manage the broker contract.
Accounts payable parameters:
1. Go to Accounts Payable > Setup > Accounts payable parameters
2. Click on Broker and royalty tab > Brokerage section
3. Differential journal name: Select the journal name (Journal type 'Daily') from the dropdown . This journal is used to post the cancelled brokerage amount
4. Expense journal name: Select the journal name (Journal type 'Daily') from the dropdown . This journal is posted when broker claim is approved. This journal reverses the posting which is done in the form of charges when sales order is invoiced
5. Manual posting: Manual posting checkbox needs to be checked if you want expense journal to post automatically when brokerage claim is approved
6. Procurement category: select procurement category to which commission will be applied
Once this setup is done. Go to the Number sequence tab in Accounts payable parameter:
7. Select number sequence code in Broker claim invoice. It is the invoice id of the vendor invoice generated when approving the broker claim
Setup differential reason
1. Go to Accounts payable > Broker and royalties > Differential reasons
2. Select differential reason for broker commission such as order return and select the main account for posting this difference in differential journal.
3. Select reason code, description and main account
Setup charge code to calculate brokerage during sales invoice
These are the charges which are applied to sales order for broker fee calculations.
1. Go to Accounts receivable > Charge setup > Charge code
2. Select Charge code, Description, debit & credit ledger account and posting types as 'broker fee'.
3. Ticked prorate checkbox so that charge will applied on prorate basis
4. Select item sales tax group if you want tax to be applied on charges.
Once all the setups are done, it is the time to setup broker contract in the system.
Setting up the broker contracts
Broker contract is like an agreement with vendor/broker that specifies the fee or commission, a broker will receive against the sale of item(s) when claim is settled.
1. Go to Accounts payable > Broker and royalties > Broker contract
2. You can see there are two sections: upper pane and lower pane.
- Broker contract: Upper pane maintains the broker contract status, broker account (Vendor account), validity period etc.
- Contract details: Lower pane maintains the items details, charge code, brokerage value in terms of percentage, fixed value or per unit, currency etc.
3. Here we will create a new brokerage and for that click on 'New'
In the upper section, enter broker contract information:
4. Status: You can see status of the broker contract is 'Planning'. It is the first state where all the planning and agreement happen with vendor/broker
5. Broker contract ID: Enter broker contract id and description which will uniquely identified the broker contract
6. Broker vendor account: Select vendor account from the dropdown. This vendor is nothing but a broker who is responsible for selling the item(s) for earning the commission
7. From date and To date: Select validity of the broker contract. It is the duration during which broker contract will be valid and brokerage will be calculated against the sell of item for the broker. Select 'From date' and 'To date'
8. Charge code: Select the charge code which was created during the setup. It will be applied to sales order for generating the brokerage amount
9. Category: Select category. It is nothing but the way brokerage will be calculated.
- Pcs: This can be based on quantity i.e. broker fee will be generate based on the quantity of item(s) sold.
- Percentage: If this is a percentage, the brokerage will be calculated as a percentage of total amount of item sold in the sales order line
- Fixed value: It is a fixed amount, broker will receive against the sale of item in the sales order
10. Charge value: Once category is selected, enter the value in charges value field. It is the value which will be used for calculating the brokerage
11. Charge currency code: Select charge currency code as well for applying the charges in that currency
Once values are entered in the upper pane, go to the lower pane to select contract details which are applicable to this contract such as specify the product code type, Item relation and customer or customer groups to which this contract is applicable etc.
In the lower section, enter broker contract details information:
12. Once details are added in the upper pane, go to lower pane and click on Add line to add item(s) and other details for setting up the contract
13. Product code type: Select product code type as 'Table' (For single item), 'Group' (Group of items) or 'All' depending on to which item(s) you want this contract to be applied i.e. for single item, or for specific group of items or for all items sold by the company
14. Item relation: Once value is selected in product code type, select item relation value accordingly i.e. If table is selected in product code type then select a item number in the item relation field. It means broker contract is applicable to this single item. If Group is selected in product code type then select item group in the item relation field. it means broker contract is applicable to this particular group of item. If 'All' is selected in product code type then item relation field is disabled as it means brokerage is applicable to all items in that legal entity
15. Party code type: Select party code type as 'Table' (For single customer), 'Group' (Group of customers) or 'All' (All customers) depending on to which customer(s) you want this contract to be applied
16. Account selection: Once value is selected in party code type, select account selection value accordingly i.e. If table is selected in party code type then select a customer in the account selection field. It means brokerage contract is applicable to sales order created for this single customer. If Group is selected in party code type then select customer group in the account selection field. It means brokerage contract is applicable to sales order created for this particular group of customers. If 'All' is selected in party code type then account relation field is disabled as it means contract is applicable to all the customers in that legal entity
17. Break type: In the Break type field, select either quantity or amount which act as a basis for calculating the brokerage amount
18. Break: In Break field, we can specify the break value for the quantity or amount as selected in the Break Type field. Value entered here will act as a minimum quantity or amount for calculating the brokerage as per the break type selected
19. Values for other fields such as category, charges value, charges currency code will be flow automatically from the header which can be overridden as needed.
20. Once details are entered in the lower pane, status of the broker contract should be changed from planning to approved. Once status is approved, no further changes to contract terms are allowed.
Note: Contract terms cannot be applied to sales order unless the status of the broker contract is changed to approved.
21. There are other statuses as well which can be used as needed for the broker contract:
- Canceled: when contract with the broker is cancelled, the status should be changed to canceled
- Closed: when contract with the broker is over, the status should be changed to closed.
22. Once status is changed to approved, the contract is ready to be applied to sales order for calculating the commission/ fee for the broker.
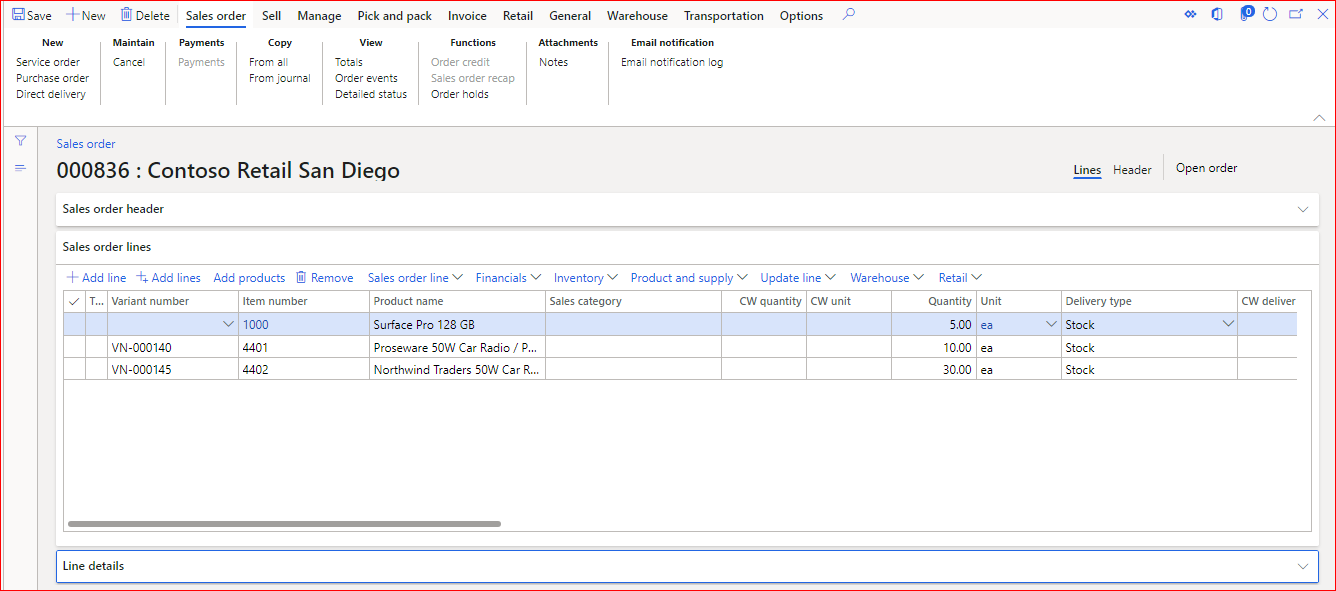
Create Sales order
1. Now create sales order by taking same customer and item(s) which was the part of broker contract
2. To view the commission calculated as per the broker contract, click on sales order line > Broker commission
3. You can see commission will be calculated for item 1000 as below:
In this 5 quantity is selected in the sales order line. and in the broker contract 10 percent brokerage is promised for minimum of 5 quantity.
Net amount = 9500 for the sales order line
10 % of net amount = 9500 * (10/100) = 950
Note: Here minimum 5 quantity is required in order to generate the commission for broker as that is the break quantity for this item in broker contract.
4. Similar is the case with other brokerage calculations as well:
For item 4401: (Fixed amount 5 USD is applied)
For item 4402:
5. This is the as on commission based on the current values (quantity, net amount) on each sales order line. Value of the commission can be changed in case values from the sales order line are changed. This can be possible unless sales order is not invoiced
6. Once sales order is invoiced, we can see commission is available for claim for the broker. Until this time, commission is only calculated based on the current sales order line values. Once sales order is invoiced, the calculated commission is posted in the ledgers defined in the broker charges and is also available in the broker claim form for realizing it for the broker.
7. You can view the posted commission in the ledger account defined in the broker charges during setup and from the trail balance as well. This amount will then be reversed when broker claim amount is actually settled.
Broker claim
1. Go to Accounts payable > Broker and royalties > Broker claim
2. We can see broker payment is available for the sales order in the open status in broker claim form. We can see the total amount of brokerage generated against the sales order along with other details such as broker (vendor) id against which this brokerage is generate, total qualified amount for brokerage, total invoice amount and charge code etc.as seen above.
3. This form displays all the brokerage generated in the system along with its status (Open, Closed and All)
4. Once Broker claim is review, it needs be to approved and for that you need to enter the amount under 'Approving' field in broker lines
5. Click on 'Approve'. Once approved, you can see the amount under approved field in the broker claim header and lines. Broker claim header displays the consolidated value of approved amount from broker claim lines
6. Also once you click on approve, system automatically creates the vendor claim invoice and post the expense journal in the general journal section.
Note: Manual posting checkbox is not ticked in the accounts payable parameter during setup hence you can see expense journal is posted automatically. If review is needed before posting then tick the manual posting checkbox.
7. Go to the expense journal, you can see the commission which was posted against the sales order in the form of charges will be reversed i.e. what was credit earlier is debited now and what was debited earlier is credited now in the expense journal. (You can also see these postings (debit/credit) in the trail balance or in those ledgers as well)
8. Apart from posting in the expense journal, it also generates the vendor liability in the form of vendor claim invoice. Go to the vendor invoice/ transactions to view the details
9. This broker commission which is now available as vendor liability will be settled either through payment (payment journal) or by other means as per the standard D365 F&O practices.
Close broker claim
1. Go to Accounts payable > Broker and loyalties > Broker claim
2. Marked the broker claim for closure
3. Click on Close
Note: you can also mark individual broker claim lines and close them instead of closing the entire broker claim.
4. Once closed, you cannot edit the broker claim further, Also you cannot open it again.
In this way broker contract is setup in the system and broker payment/ fee is managed.
Hope!! Everyone gets clear understanding of Broker Contract Management in D365 F&O
Please post if any queries and do let me know if any suggestions for improvement.
See you soon with new post :-)
Happy Daxing !!!
-------------------------------------------------------------------------------------------------------------------
Abhijeet Hele |
Dynamics AX Enthusiast |
My Profile |
The information provided on this site represents my own opinion/view and does not represent the opinion/view of my employer or Microsoft.